Material for MkDocs setup
Create a live container
A script is used to run for the build command for the deployed setup, however for testing changes live a persistent container serving mkdocs-material is much quicker and easier to use as changes are displayed instantly (esp if editing using SSH Remote connection in VS Code).
To enhance the documentation site plugins are used to extend the functionality of Material for MkDocs. The main ones used in the case of this site are:
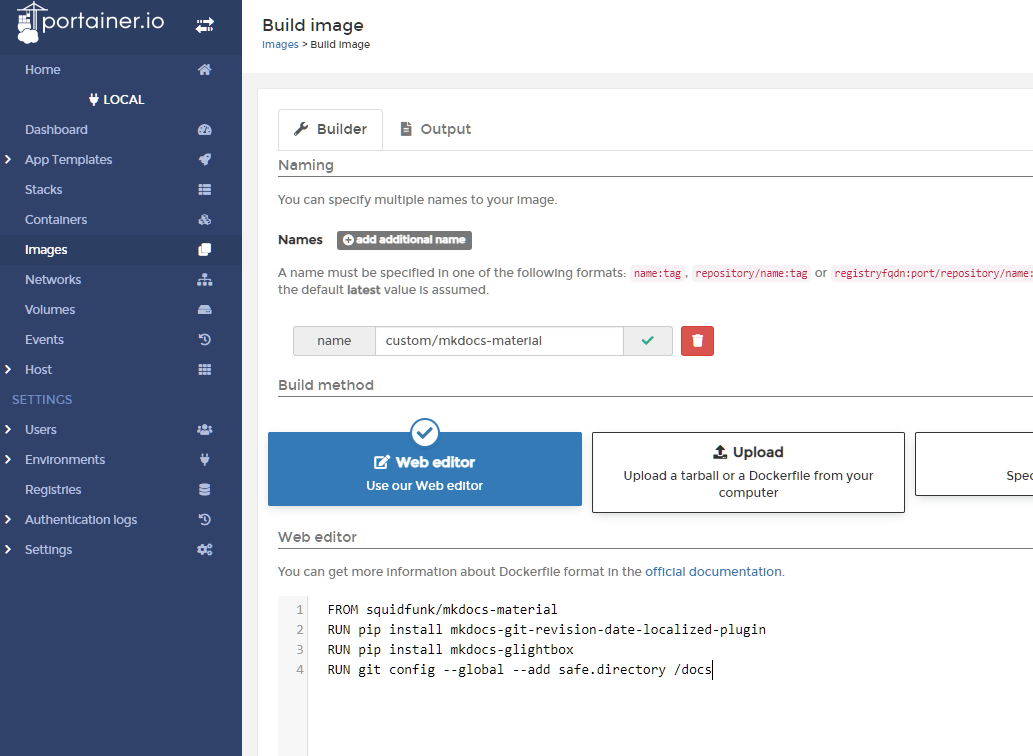
These need to be installed by pip on top of the main mkdocs-material image, therefore a custom Dockerfile is needed to add the relevant colour commands and create a custom image before they can be activated in the mkdocs.yml configuration file:
mkdocs.dockerfile - use in Portainer as Images > Build image
docker build or Portainer:
. at the end is important as it sets the build context and the command won't work without it!
docker build known issue
Docker build scans the whole directory structure therefore rather than placing the dockerfile in the home directory, place instead in an empty subdirectory (e.g., dockerfiles), otherwise you will receive an error saying "error checking context: 'no permission to read from [folder xyz]'"
Now that the custom image has been created above, a docker-compose file may be used to create a stack in Portainer. The benefit of having this as a stack as is that it can easily be re-deployed, for example when the underlying image has been updated with a new plugin or a new version.
docker-compose/mkdocs-live.yml
However as a custom image is now in use the Watchtower system will not be able to monitor it (as it has nothing to compare it to). It is therefore necessary to create a (stopped) container using the standard image that can be monitored by Watchtower. When the update email mentions an update to this image a new custom image can then be rebuilt and deployed.
docker-compose/mkdocs-checkforupdates.yml
Updating the custom image
How to check the installed version of mkdocs-material (e.g. to ensure a custom image has updated)
When a new version is released the following steps need to be undertaken to update the custom image:
- Rebuild the custom container (see instructions above) or run
mkdocs-update.shafter ensuring the dockerfile is in the same directory - Redeploy the
mkdocs-livestack (so that it switches to use this updated container, otherwise it will continue to use the old one) - do not tick the 're-pull' image option as the image is stored locally, not on dockerhub. NB If themkdocs-checkforupdatescontainer wasn't updated by Watchtower then this will also need to be updated - Remove the old image (this will now be untagged in the image list as the tag transferred to the new custom image and will also now show as unused. Prior to step #2 this would still be used by the mkdocs-live container)
New site
If creating a new site then use the command via Docker to create a new empty set of template files:
Logo/Favicon setup
Place desired PNG/SVG logo and favicon.ico in docs/images.
See https://realfavicongenerator.net/ to generate a favicon from a logo.
NGINX install
NGINX is going to be the webserver providing the static pages generated by mkdocs to users.
As with other containers it is important to ensure when deploying container, that the network is set to nginx-proxy-manager_default. It is also important to bind /usr/share/nginx/html on the container to /var/www/<sitename>/html (or another directory) on the host
docker-compose/nginx.yml
Then in NPM add a proxy host redirecting to port 80 on the nginx container. Switch on all SSL options and obtain a LetsEncrypt certificate. If non-public then add Authelia advanced proxy info too.
Awesome Pages plugin usage
Refer to .pages from Awesome Pages plugin
